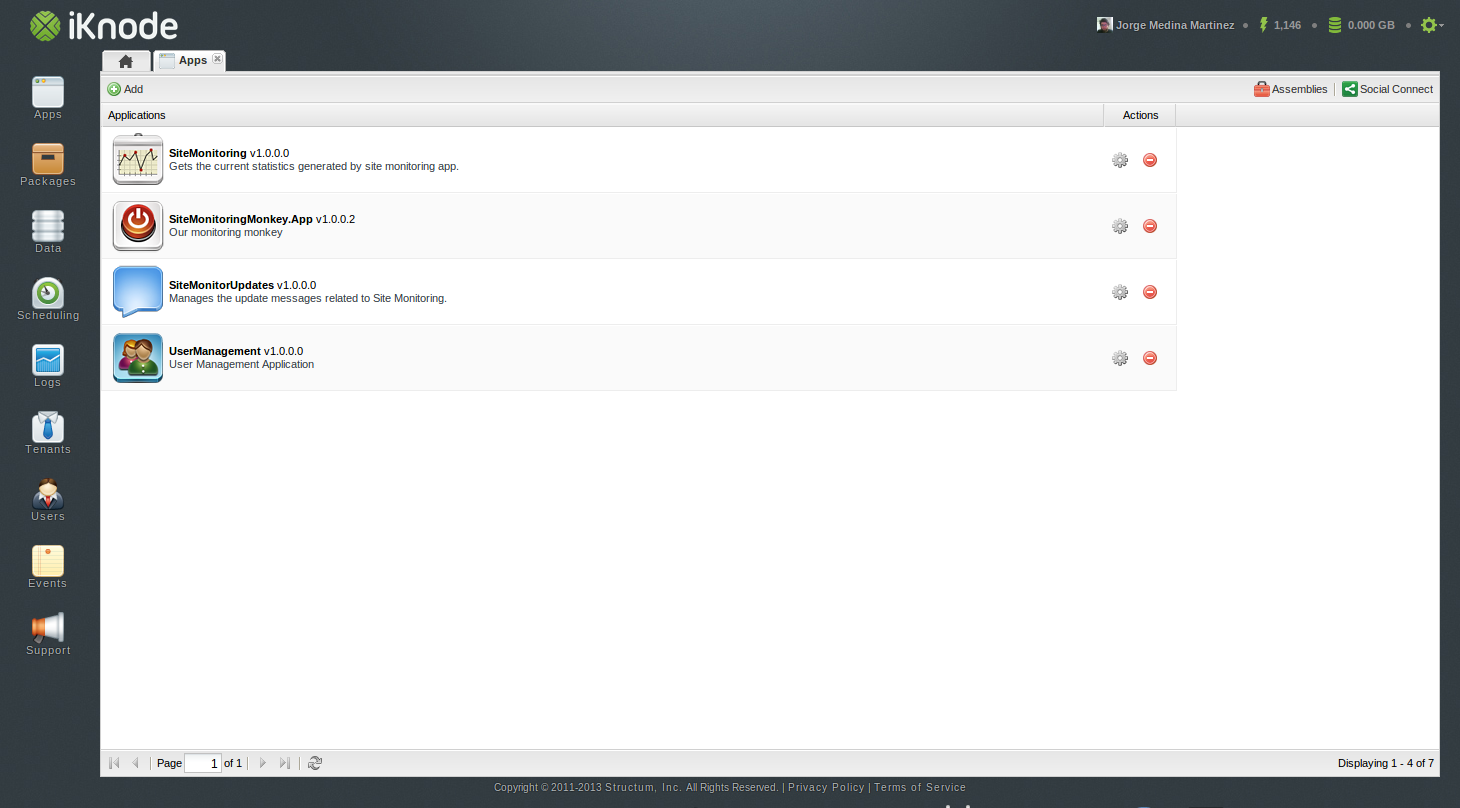
The User Interface is very simple. We have a Main Menu on the left which contains all the featues you account can access; At the top we have the Profile and Settings Menu, which provides all the functionality to manage your account, you can also see a couple of indicators for the API calls and storage usage; In the Center we have the Application Dashboard, which makes all Published Apps and Installed Packages accessible.
Everything can be best explained with the following screenshot:
Using the Editor
The Application Editor allows you to:
- Create your applications.
- Modify and execute your applications for testing purposes.
- When your application is ready, you are able to Publish them.
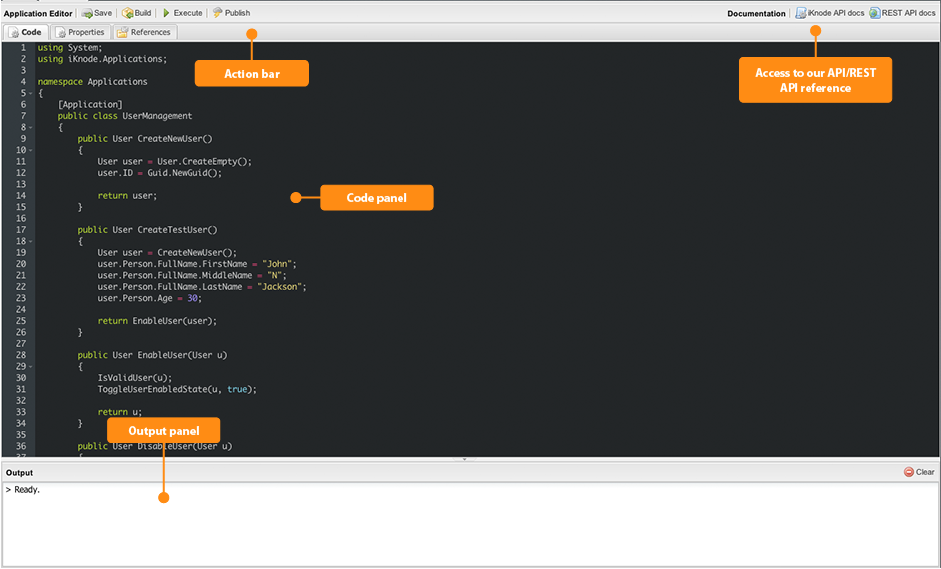
There are 4 sections present in the Editor:
- The Action Menu.
- The References and Properties Pane.
- The Output Pane.
- The Code Pane.
This is better explained with the following screenshot
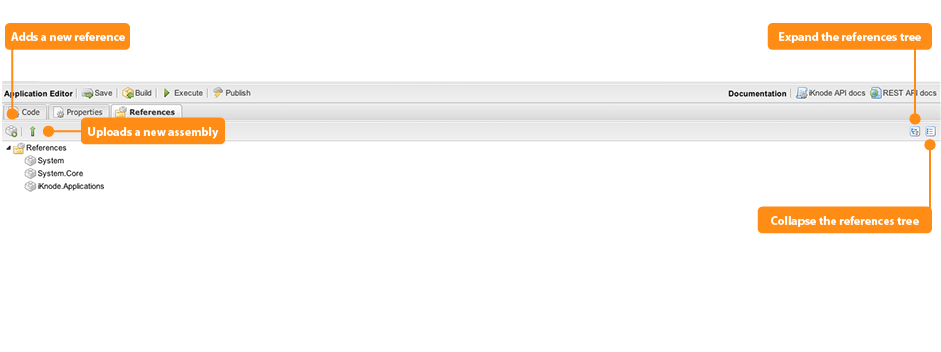
References and Properties section
The References pane, allows you to manage your assembly references for your application.
Something to mention about the Properties is that the Name and Icon are used to display the
application in the Dashboard. It is very important to notice that the Application Name in the Properties needs to be *Unique* because this is the name used for your application in the platform. The Application Name is the one used when calling the application from the API, and from the Dashboard.
The Action Menu on the top part of the editor, allows you to save, compile, execute an publish your application. An application starts as a draft while being compiled and tested in the editor. An application with draft status cannot be accessed by clients either through the API or through the Dashboard. Once the application is completed and ready to be used, click the publish button, which will effectively make it accessible to all your clients. If for any reason, the application is saved again, recompiled or executed using the editor, the application will go back to a draft state and won’t be accessible to clients.
Writing iKnode Applications
iKnode applications are represented with a single C# class containing the [Application] attribute. An application provides functionality through its public methods. So, any public method the class contains, will be exposed for clients to access it.
The following application is called HelloWorld and exposes two public methods Hello and HelloYou:
usingSystem;usingiKnode.Applications;namespaceApplications{/// <summary>/// Defines the Main entry point of the HelloWorld application./// </summary> [Application]publicclassHelloWorldApp{/// <summary>/// Returns a simple hello!/// </summary>/// <returns>Returns a simple Hello!</returns>publicstringHello(){return"Hello ";}/// <summary>/// Returns a simple hello! to you./// </summary>/// <param name="yourName">Your name.</param>/// <returns>Returns a simple Hello! to you.</returns>publicstringHelloYou(stringyourName){returnthis.Hello()+yourName;}}}
It is important to mention that, just like when building services, the methods exposed in an application cannot have the same name; even if .Net allows it. The main reason is that in the engine, this class becomes a service endpoint, and application methods need to be unique.
Using the Data Storage
iKnode has a document based data storage, which users can use to save data, this is useful since
iKnode apps lifetime are limited to the actual request, users might want to persist information for later use. Go to the left menu, click on Data, the following UI should be displayed:
The Data Storage works with Collections and Documents In the left panel, you can see all existing collections or empty if you have not crated one. Once a collection is selected, its documents and information is displayed in a grid in the central pane, additionally we provide the user with a Query Console tool we’ll explain later.
Collections contain Documents, Documents contain Fields that’s it, this section allows you to create and delete Collections, insert, modify and delete Collection Documents.
When we create a Collection, the schema itself is defined, there’s no way to change it, the only way to modify an existing collection is to re-create it, we intend to support this feature in a short-term period.
So let’s create a collection and start adding documents to it, click on the New Collection button and the following window will pop-up
First we type in the collection name and then we proceed with the fields, add as many fields as you need, you specify the name for each one of them, once you are done click Save, the Collection should appear in the left pane.
Click on the Collection you just created, you can now see in the central pane, the grid which shows the collection documents, in our case the grid is empty. To add a new Document click on the New Document button, the following dialog will be displayed
As you can see the dialog displays a input field for each one of the fields defined before
when creating the collection, so you just need to provide some input for each of the fields and worths mentioning that all fields are optional. After providing the values for the fields, click Save, The document you just added should be displayed in the grid, additionally the user is allowed to manage the documents, meaning the user is able to edit and delete existing documents, this is explained in the screenshot below:
To delete an existing collection, right click on it and click the only option available, which is delete collection. That’s it, now you might be wondering how to use your collections in your app, to store and retrieve data, take a look at the Data Access section.
Calling Your Application Remotely
iKnode has a REST-like API, which let’s you call your applications. Each of your application becomes a Web Service and can be called from the API. The API has a set of custom credentials that are simple and secure.
The first thing to do is get identify API Credentials. You can find those by clicking on your profile and copying the UserID and API Key:
We have two versions of the API available. We recommend v3 for new applications. IF you are using our SDKs, you don’t have to worry about the API version. The SDK will use the latest version without you having to know the internals or change your code.
The latest version of the API is the cleanest yet. Version 3 is a REST-like API which uses POST for requests. JSON is used to send parameters, also used as a response. The User Identifier is used in the request URL, and the API Key is sent accross in the request headers.
API endpoint
https://api.iknode.com/v3/[YOUR-USERID]/[ApplicationName]/ApplicationMethodName]
Credentials (Custom Header)
iKnode-ApiKey: [YOUR-APIKEY]
Request
JSON
Response
JSON
For example, if we wanted to call an application named HelloWorld and execute it HelloYou method, this would be the request using cUrl:
In this example, the “HelloYou” method expects a parameter named “yourName”. In order to send parameters to your applications, just encode them as json, and send them in the POST body. If you have more parameters
API v2
API endpoint
https://api.iknode.com/Applications/execute/[ApplicationName]/ApplicationMethodName]
Credentials (Custom Header)
iKnode-UserId: [YOUR-USERID]
iKnode-ApiKey: [YOUR-APIKEY]
Request
JSON
Response
JSON
Now, when calling your application using curl you would make that call like this:
The payload contains a parameters variable which holds a string. The string should contain the method arguments for your method, and it should be encoded in JSON. This gets complex as you start passing more complex objects. So We recommend using the SDKs.
Calling the API using the Javascript SDK
The SDK simply the work so that calling iKnode feels like calling a local class, instead of a remote service.xs
If you are working with C# this is how you would call the above application:
In this case we are sending a string and returning a string, but you can send and receive complex objects. With the SDKs, is extremely easy todo. The SDKs are created to mimic the same flow. So if you learn one, you’ll esily pick up the others.
If you are using Javascript, this is would be the code to use to call your application:
Besides using the String type as a return type, you are able to use complex types for your method parameters or return types, let’s think of of a small user management system app, which creates users, change passwords, lock user account etc, so our entity is the user and let’s think of our app name as UserManagement.
So I defined the following entities:
- Name
- Person
- User
[Application]publicclassUserManagement{publicUserCreateNewUser(){Useruser=User.CreateEmpty();user.ID=Guid.NewGuid();returnuser;}publicUserCreateTestUser(){Useruser=CreateNewUser();user.Person.FullName.FirstName="John";user.Person.FullName.MiddleName="N";user.Person.FullName.LastName="Jackson";user.Person.Age=30;EnableUser(user);returnuser;}publicUserEnableUser(Useru){IsValidUser(u);ToggleUserEnabledState(u,true);returnu;}publicUserDisableUser(Useru){IsValidUser(u);ToggleUserEnabledState(u,false);returnu;}privatevoidIsValidUser(Useru){if(u==null){thrownewArgumentNullException("Expected valid user instance, null found");}if(u.ID==Guid.Empty){thrownewArgumentNullException("No such a valid User");}}privatevoidToggleUserEnabledState(Useru,boolisEnabled){u.IsEnabled=isEnabled;}}
You may already noticed that we are using our defined User type, along with all other types
as Person and Name.
Something I need to mention is that in order to use define types as we are doing with User, we need to declare
those types as public, meaning, these classes need to be visible, we can declare private or use the default
scope since iKnode needs to know about these types.
You might be wondering What happens when we return a User instance from our app? what iKnode does is that
it serializes the object into a JSON representation, meaning that you’ll recieve your object in your client
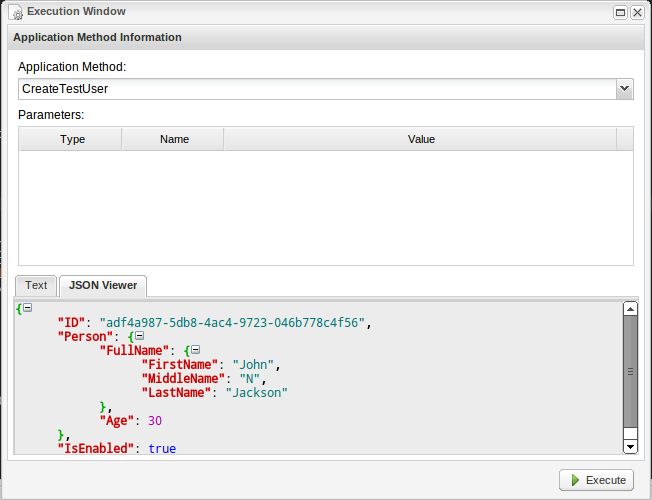
app as JSON representation. If we execute, let’s say, the CreateTestUser method, the output will be the following
Our method takes now arguments, you can see in the method definition how the User instance is built and returned to the client. On our end, we see the User instance serialized into JSON.
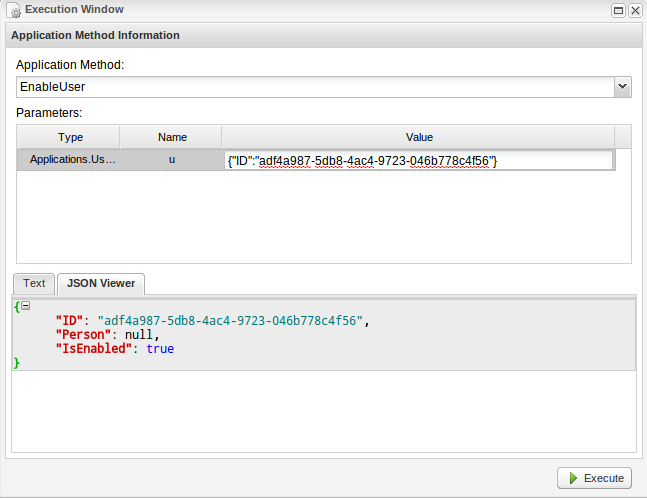
Now, how does it work the opposite way, send a User object, as you are probably thinking, we need to send a JSON representation of the User, something to remark here is that we can only send the properties we care, the only rule is that those name must match the names as defined in the Class.
Our example in this case is going to be the EnableUser method, if we take a look at the method code we’ll see that it accepts a parameter of type User and it only validates the user ID and access the IsEnabled property, so we just need to send the ID, our JSON expression for this would be:
1
{"ID":"adf4a987-5db8-4ac4-9723-046b778c4f56"}
What happens behind the scenes is that iKnode takes the JSON representation sent and tries to serialize it into the type defined for the parameter, in this case, User. As we are sending only the ID property, iKnode will create a User instance with only the ID property set to the value we sent and pass it as argument for our method. And that’s it, if we execute our iKnode app, the output would be the following:
We can see the method sends the same user instance back, we see the same ID we sent plus the IsEnabled property set to true. You may give it a go using our REST API through CURL or Fiddler, you should get the same result. The method DisableUser should work pretty much the same, it’ll just set the IsEnabled property to false.
Combine Applications
iKnode Apps can be combined easily by calling the applications you need from your own iKnode application. It is so simple, just use this code to call another application:
Let’s see a complete example. Let’s say you use the SiteMonitor application which checks if a site is up and returns metadata about the call, and then you want to store that in a database by using another application named MonitorStatusRepository:
Execute ServerMonitor.App form your application.
1234567891011121314151617181920212223
usingSystem;usingiKnode.Applications;usingiKnode.Applications.Data;namespaceApplications{ [Application]publicclassMyApplication{publicboolCheckSite(){ApplicationServicesvc=newApplicationService();// Get Site Status.Documentresult=svc.Execute<Document>("SiteMonitor","CheckStatus",newMethodParameter("url","http://iknode.com"));// Store the Site Status in the Data Store.boolsuccess=svc.Execute<bool>("MonitorStatusRepository","Save",newMethodParameter("metadata",result));returnsuccess;}}}
It is very simple. You can call any application as long as it is published.
Data Access
Now you perhaps already have defined some collections and documents, you perhaps are wondering
how to make use of it, add, remove & modify documents in your iKnode apps.
We provide a set of classes through the iKnode.Applications.Data namespace, some of the key classes are:
- Document
- DocumentRepository
An instance of the Document class represents a document stored in any Collection of yours, you can access all fields defined throuhg it.
The DocumentRepository class defines a set of methods to manage Documents, allowing the user to store, remove and retrieve documents, the only thing we need to specify for the Document instance is the Collection we want to manage the documents from, we do this by specifying the collection name, let’s see an example:
An example of the Document class
123456
conststringCOLLECTION_NAME="LogEvents";Documentdoc=newDocument(COLLECTION_NAME);doc["severity"]="normal";doc["message"]="Some brief text for the logging event.";doc["date"]=DateTime.Now.ToString();
We defined a document associated with the colletion LogEvents and assigned
some value to the fields severity, message and date. doc[“severity”] would be
the same as writing doc.Fields[“severity”], the Document class defines an indexer.
To save this document, we need to use the DocumentRepository class, so let’s see how to
do it, using the document previously defined.
Use the DocumentRepository class
12
DocumentRepositoryrepository=newDocumentRepository();stringdocumentId=repository.Save(doc);// Get document ID for later use.
Pretty easy right?, by default the DocumentRepository is aware of the user context and knows which user storage unit to use, the Save method returns the ID of the new document we just saved. Now, what if we wanted to retrieve all documents from the LogEvents collection? We’ve got two options here, get a list of documents or a single document.
To get a list we need to sepecify the following parameters:
- Collection to query
- Actual query to send
- Column name to sort by
- Sort diretion
- Paging start index
- Page size.
The column name and sort direction can be specified as empty strings if we do not care about
sorting. Let’s take a look at it
The first parameter as we said, is the collection name, the rest are:
- “{}” This is query expression, technically speaking, these are MongoDB select expressions, so any MongoDB-based query expression you can think of you can write them here, in this case, we are selecting everything.
- The next two String.Empty parameters are the sort information, the first one is the column name and the second one can be “asc” or “desc” meaning Ascending or Descending
- The following parameter, 0, means the page start index, this is for paging purposes.
- The last parameter, 10, is the page size, meaning how many records we want to retrieve.
Remember we defined the severity field? so let’s say we want to retrieve all documents marked as severity “critical” and sort by the event date descending, let ‘s see some code:
See how the query expression changed, we are specifying the query criteria to use, then we are not specifying empty strings as sort data, but the date column and the desc string, to sort descending. the documents variable is of type PagedList which represents a paged list of documents, the most important properties of documents are:
We are taking each of the documents in the paged list (if there’s any) and mapping each
to some other type and adding it to a different list. If we wanted to retrieve only one document, let’s say we’ve got the document id, we’d use QuerySacalar instead of QueryCollection
Let’s see an example, we’ve got a collection of users and we want to retrieve one by its ID
Using QueryScalar to retrieve a single document
12345678
conststringCOLLECTION_NAME="Users";DocumentRepositoryrepository=newDocumentRepository();stringquery="{\"userId\":\"A404590\"}";varuserDocument=repository.QuerySacalar(COLLECTION_NAME,query,"userId","asc",0,10);Useruser=MapUserDocumentToUser(userDocument);// Do something else with the 'user' instance.
As you can see we built the query and used it through our DocumentRepository object, so as there’s only one User with that ID we expect only one result, so we use QueryScalar, as you can see it takes the same arguments but returns a single Document.
Perhaps you’ve noticed twice that we mapped the documents to some other type, this means
that we are converting our Document objects to whatever core types the user defines, you’ll need to write the mapper functions yourself, we intend however to provide a built-in way to do this in the near future, so users are able to map to their types easily.
Packages
Packages provide common functionality that many applications need, so that you don’t have to implement yourself, for example twitter post, ftp upload download, etc. You can execute pacakges from the Dashboard, you can execute them from the API directly and/or you can execute them from your own applications. As a practical matter, Packages behaive just like any other Application in the iKnode platform with the exception that packages cannot be modified.
Some packages require configuration to work. Such configuration items can be created by the Package itself using the Common method *CreateConfig”. The configuration items are usually stored in the AppConfig collection in the Data Section. OAuth credentials from the Twitter and Facebook Package are created by the Social Connector.
Emailer Package
Send emails using your own Emailer Server. Configure this Application using the CreateConfig method. Multiple Email accounts can be configured by using the configName as identifier.
Emailer Pkg Related Methods
123456789101112131415161718192021
/// <summary>/// Sends an email message with the selected information./// </summary>/// <param name="configName">Config Name to use.</param>/// <param name="recipient">Notification Recipient.</param>/// <param name="subject">Message Subject.</param>/// <param name="body">Message Body.</param>/// <param name="isBodyHtml">True to send HTML in the body, fale otherwie.</param>/// <returns>Send Result.</returns>publicboolSend(stringconfigName,stringrecipient,stringsubject,stringbody,boolisBodyHtml)/// <summary>/// Creates a new Email configuration./// </summary>/// <param name="configName">Config Name.</param>/// <param name="server">Server.</param>/// <param name="port">Port.</param>/// <param name="userName">User Name.</param>/// <param name="password">Password</param>/// <param name="useSsl">True to use SSL, false otherwise.</param>publicboolCreateConfig(stringconfigName,stringserver,intport,stringuserName,stringpassword,booluseSsl)
Facebook Package
Post messages to your facebook timeline. To Configure this application please use the Social Connector in the Apps section. Multiple accounts can be configured by using the Social Connector.
Facebook Pkg Related Methods
1234567
/// <summary>/// Posts a Message in Facebook./// </summary>/// <param name="configName">Config Name to use.</param>/// <param name="message">Message to post.</param>/// <return>True if sucessful, false otherwise.</return>publicboolPost(stringconfigName,stringmessage)
FTP Package
Upload and Download Text Files using your own FTP Server. Configure this Application using the CreateConfig method. Create multiple accounts usinc the configName as identifier.
FTP Pkg Related Methods
12345678910111213141516
/// <summary>/// Uploads a Text File to an FTP Server./// </summary>/// <param name="configName">Config Name to use.</param>/// <param name="fileName">File Name to use while storing in the FTP Server.</param>/// <param name="fileContents">File Contents.</param>/// <returns>True if successful, false otherwise.</returns>publicboolUploadTextFile(stringconfigName,stringfileName,stringfileContents)/// <summary>/// Downloads a Text File from an FTP Server./// </summary>/// <param name="configName">Config Name to use.</param>/// <param name="fileName">File Name to download.</param>/// <returns>File Contents.</returns>publicstringDownloadTextFile(stringconfigName,stringfileName)
Logger Package
Log Errors and Events with this application. This package requires no configuration, and stores the logs in the Logs collection.
/// <summary>/// Adds a new Warning entry./// </summary>/// <param name="application">Application name.</param>/// <param name="source">Application module or service.</param>/// <param name="message">Log message.</param>publicvoidLogWarning(stringapplication,stringsource,stringmessage)/// <summary>/// Adds a new Event entry./// </summary>/// <param name="application">Application name.</param>/// <param name="source">Application module or service.</param>/// <param name="message">Log message.</param>publicvoidLogEvent(stringapplication,stringsource,stringmessage)/// <summary>/// Adds a new Error entry./// </summary>/// <param name="application">Application name.</param>/// <param name="source">Application module or service.</param>/// <param name="severity">Error severity.</param>/// <param name="message">Log message.</param>publicvoidLogError(stringapplication,stringsource,stringseverity,stringmessage)/// <summary>/// Adds a new entry into the logs./// </summary>/// <param name="application">Application name.</param>/// <param name="source">Application module or service.</param>/// <param name="type">Error type.</param>/// <param name="severity">Error severity.</param>/// <param name="message">Log message.</param>publicvoidLog(stringapplication,stringsource,stringtype,stringseverity,stringmessage)
Site Monitor Package
Application that helps you Keep track of your site by checking the status of your http/https site or your net.tcp services. This package requires no configuration.
Site Monitor Pkg Related Methods
123456
/// <summary>/// Checks the status of the selected Site by url./// </summary>/// <param name="url">Server URL to check.</param>/// <returns>Status Results Document.</returns>publicDocumentCheckStatus(stringurl)
Twitter Package
Post messages to your twitter timeline. To Configure this application please use the Social Connector in the Apps section. Multiple accounts can be configured by using the Social Connector.
Twitter Pkg Related Methods
1234567
/// <summary>/// Posts a Message in Twitter./// </summary>/// <param name="accountName">Account to use.</param>/// <param name="message">Message to post.</param>/// <return>True if sucessful, false otherwise.</return>publicboolPost(stringaccountName,stringmessage)